People ask me sometimes how things are going at the house, how we're making out. My automatic response to the question seems to be, "well, we are moving forward, slowly, but still forward!" We are finally in the finishing stages of the second floor areas! The bathroom is 95% completed. As of last night, the walls and floors in the hall and sitting room have been painted, the old kitchenette has been completely remove and all the drywall is finished and ready for paint in the 'blue' bedroom!
Occasionally, I look around the house and I try to visualize what the place looked like when we first stepped through the door. Thankfully, it's not as easy to remember all the gory details any more! I know that we still have quite a bit of work ahead of us and I wonder sometimes what we have accomplished and for a brief moment, a part of me thinks that we haven't made any headway. Then I go back to the photos which we had taken before we began any work and I realize that, yeah, we have come a long way in the past couple of months considering we are trying to do it on our busy schedules!! So, the photos below are a brief interlude to show what we had to deal with upon our initial inspection, minus the garbage and smell that we left for us by the previous tenants! Enjoy!
*Please note: Due to the graphic nature of the following images, we are not responsible for any visual and/or psychological damage incurred by the viewer. You the viewer reserve the right to laugh, vomit and /or shake your head in dismay at the following content.
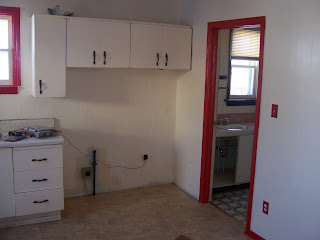
The above pictures show the left and right side of the main floor kitchen before we started. I just wish they had left the red knobs on the cabinets! They added a sort of, je ne sais quois!
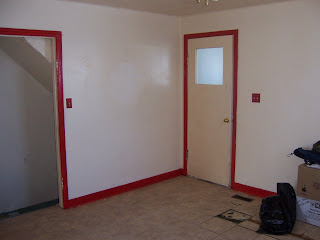
These pictures complete the 360 degree view of the kitchen area. Left, shows the entrance way to another bedroom, a closet, a closet the living room and the basement door. On the right, the basement door and the main entrance. Thankfully, all doors and baseboards were painted a nice glossy Tremclad Fire Engine Red, so that they can easily be located whilst navigating your way through billows of cigarette smoke, no less! Yeah, we got rid of the red. . .
Ah, it is to laugh, (or cry)!! This is a great example of what NOT to do!! If you can look past the flooring tiles lining the shelf, you will see a spider's web of wires twisted haphazardly amongst leaky pipes beneath the rotting kitchen sink! Yes, that's actually the drain from the dishwasher pointing away from the main sink drain! I'm not sure if the electrician tried to play plumber or vise versa, but whatever the case, it's WRONG!! My thoughts on this situation, and any situation that involves serious renovation, if you don't know what you are doing, STEP AWAY FROM THE TOOLS!!
We have completely removed all traces of what was 'the kitchen', (with exception to the trim around the windows, we installed clear plastic insullation imediately upon possession to save heat), and repaired what needed repairing or improving! We will post more pictures later of what we have accomplished! Actually, I could post them all now, but then there would be nothing to show later!! Hopefully you will be feeling better soon, after viewing these photos, and we hope to read your comments! Take care!
Tuesday, March 24, 2009
Saturday, March 21, 2009
The New Vanity
Well, with the priming and painting completed and the new flooring installed, it was time to tackle the new vanity! Anything would have been a definite improvement over the, uh... I'll just say installation, that had occupied the space before! (You can refer to the previous pictures of the old bathroom for reference if you wish but I think that if you had seen it once, you really wouldn't want to see it again!)
So, what were we to do with the space? This simple question had produced a mass of possibilities and even though we tried to keep things as simple as we could, it still brought up many questions! Should we go with a pedestal sink or cabinet? Regular bowl? Under-mount? How about a vessel style bowl? There was also, what colour and material should we have for the top? Never mind the plethora of faucet choices that were available to us! But with a bit of measuring and adopting the process of elimination, we were able to put together quite a sharp looking piece!
It was decided that we should just build the cabinet ourselves. If we made it to the maximum allowable size for the space available it would avoid any headaches in trying to locate a custom cabinet that probably wouldn't fit in the odd sized space anyway! My good buddy Moe Lapalme jumped right in on this one! He had consulted with Melinda and Meghan, measuring out and helping them decide what they want and need for the base cabinet. Once the final decisions had been made, Moe, using some nice plywood and his cabinetmaking expertise, created exactly what they needed for the space!
Once the base unit was touched up with wood filler, primed and painted, it was ready to be installed! Holes were cut in the floor of the cabinet to allow for the plumbing and the doors and handles were installed. Alright, almost half way there!! Melinda and I went out one day to look at what colour choices were available for laminate tops and we found three or four that would go nicely with the colours that were chosen for the bathroom as well as with the fixtures. We went with a copper coloured laminate which complemented the red in the flooring and grounded the yellow walls nicely. Meghan really wanted the blue glass vessel bowl from Home Depot, but we had to settle for a less expensive alternative, so we went with a white vessel bowl instead. It was about half the price but still a really good choice!
Okay, base was in, top was on, bowl was attached with silicone. . . what's next. . . oh, right! The plumbing!! I think that everyone should know a bit about plumbing so I wanted to get Meghan in on it, since this was for 'her' bathroom!
A bit of plumber's putty to create a seal around the drain and the bowl, then she attached the faucet lines to the water feed lines in the base cabinet. Once the water lines were hooked up, the real puzzle began! Trying to figure out how to get the water in the bowl to go down that stupid other pipe that didn't line up!!
Okay so maybe this part of the plumbing thing requires a bit more expertise, especially when the glue comes into play! Meghan suggested that maybe I should take it from here!
Alrighty then! The bowl is on, the faucet is attached, the water lines and drain are hooked up, I guess all there is to do now, is to try it to see if there are any leaks! Meghan was given the honour of 'tapping the keg'! Once it was decided that there were no leaks, we all took turns (because there wasn't a lot of room in there) checking it out and playing with the faucet!
Nice bathroom! Good job, everyone!
Wednesday, March 18, 2009
Working in the Old Kitchenette
We were working in the former kitchenette today. We've decided to turn it into a small den/sitting area. At the beginning of the month, we removed the upper cabinets (which were metal, not wood) and the lower cabinet where the sink was hooked up. Now that was a mess!
Once we removed all the cabinets, Corrie discovered a few problems - like the plumbing! and a little mould! and a piece of the wonderful old wood flooring missing! and a huge mess of insulation (if you can call it that) under the floor! Just click on the before pictures to see what he found and what we removed.
Jamie and I removed the ugly, mouldy piece of drywall below the window today - it was so brittle that small pieces just broke off as we tried to pull it. Behind that we found the old insulation which we got rid of - carefully since it was falling apart. Once we swept, we put in the new insulation and Corrie put in the new vapour barrier.
Corrie and Jamie put up the new drywall. Meghan tried to do the measuring again - but gave up! Corrie saved us the frustration and measured the space. Jamie got to use the "drywall screw gun" which I simply call "that loud drill thing which puts in the drywall screws faster than I can by hand - without putting drill marks on the new drywall" - I think my term is much more accurate than Corrie's even if it is longer to say! Jamie then did the tape and the mudding for the first time. He says that it's kind of like making a pinata (or anything else out of papier maché) except you flattened it with a trowel and not your hand.
We're now ready to build a little shelf to hide the pipes!
Tuesday, March 17, 2009
Flooring in the Small Bathroom
I had no idea that putting down peel-and-stick tiles on the bathroom floor would be more work that completing the flooring in the entire kitchen and den area! . . . but I should have! Why - you might ask?
Let's think about this - it's a small room and therefore there aren't many areas that you can use full tiles (about 12 or so). This means that you have part tiles along 2 entire walls and then you have to cut tiles around the toilet and the sink area. If you haven't seen the pictures of the little bathroom, then you don't know that there's a little half-wall at one end of the tub. In the end, more than half the tiles we placed, needed to be cut. In other words, a lot more time was required than I originally figured - oops!
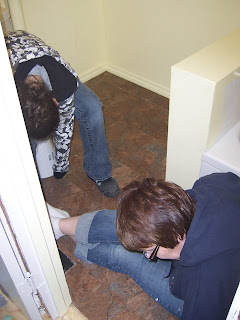
We (Corrie, Meghan, and I) completed the job yesterday and it does look pretty good! Meghan and I put down the full tiles by ourselves. We even measured and cut the tiles around the toilet - of course, we had Corrie remove the toilet first so we couldn't mess up too badly. Neither Meghan nor I like to cut with a utility knife, but it turns out that I'm a little better at it than she is. We eventually just called Corrie to help us cut the tiles. He is definitely much better and straighter. Also, he's faster too.
We became the measurers! The only problem - Meghan and I are good with the simple measures like inches, half inches, and quarter inches . . . even eigths of inches we can handle, most of the time. If stuck, Meghan just uses the old stand by method - one tick past the half or two ticks less than the three-quarter mark. It was when the tape measure was giving us measures of 16ths that we started laughing a lot. Especially when we figured out that the walls weren't square and we had pieces where the measure was 5 1/8" at one end and 4 7/8" at the other. Of course, then we learned that there were "heavy" and "light" measures too. So - our 5 1/8" was heavy and then our 4 7/8" measure became a light 7/8". Of course, some of the pieces ended up having to be trimmed. I am happy to say that none of the pieces were too small!
I guess, toward the end, Meghan did a lot more sitting than anything else and she got bored. She filled in her boredom by playing washboard with the heat register - very annoying, but also funny. She also discovered the usefulness of a tape measure. Did you know that you can measure the height of a room from a sitting position? and the length of the next room by strategically leaning against the bathtub and facing out the door? and that a tape measure will suddenly bend over when extending it too far with nothing to lean on? Meghan taught me all those things and more.
Our bathroom floor is done now and looks wonderful with the yellow paint! Tomorrow will be a new day and another simple, but time-consuming job in our "little" bathroom.
The Second Bathroom
Well, We've been working in the upstairs bathroom, so that's where I'll start blogging.
The room that you're seeing is the small upstairs bathroom. When we first took possession of the house, I could barely stand to look in the room - never mind, use the toilet or sink. The toilet was filthy and it stunk! Everything in the room smelled and was dirty - I don't think that they cleaned in here the entire time they lived in the house! I actually cleaned the basement before I tackled this room. I had to wash it with TSP twice and then rinse it 3 times to get rid of the dirt and the smell.
What we encountered when we first looked!
- The smell! and the grime! - it was disgusting!
- Note the interesting ashtray (the half wall by the tub) - did they smoke while on the toilet or in the tub??
- We had to pull up the floor since it was peeling already and I couldn't get it clean.
- The small mirror - was held in place with 2 thumb tacks
- The vanity doors wouldn't close since they'd bent the hinges impossibly out of whack
- Under the vanity - a serious pile of old mouse droppings
- The 3 holes in the back corner for one bathroom exhaust fan (remember the old game, in and out the window - that explains the ductwork)
- plastic bags in all openings where pipes entered the room - used for insulation? keeping mice out? aesthetics to hide the holes? - by the way, these special plastic bags were painted - for camouflage?
What we've done to the bathroom
- first, obviously, we cleaned
- pulled out the toilet, the vanity, the sink, the mirror
- ripped out the flooring and the tile board around the tub
- replaced the old toilet with a new low-water toilet
- patched holes, primed, and painted with a pale yellow bathroom paint
- replaced the lights with new ones
- replaced the light switches and plates
- built a new vanity for the small corner (primed, painted, glued laminate top)
- bought new sink and faucet
What is left to do
- install the new flooring (unless we decide we like the rustic look!)
- install the new vanity
- hook up the new sink and faucet
- put tile board up around the tub and seal it
- baseboard along the one wall
- purchase and install a mirror of some kind
- either fix or replace the faucet in the tub
- do something about the bathroom exhaust fan and the ductwork
- figure out how Jamie can use this room without hurting his neck or bumping his head!
That's all for now! I'll post some after shots tomorrow.
Subscribe to:
Posts (Atom)