Now that we have a new set of doors to grace the entrance to our humble abode, perhaps it was time to add some curb appeal, not to mention safety and convenience, to complement the latest additions!
Ensconced between the walls of the garage and house, just below the main entrance door, there stood a set of weathered concrete steps that had undoubtedly been there for a good 30 years. These steps had definitely shown the rigors of time and the blatant disregard for maintenance over the years. Large cracks had formed and sections of the stair treads had even broken away causing a potentially hazardous descent! To protect the ankles of those who would darken our doorways, and reduce the risk of a lawsuit, it was decided that this monolithic edifice had to be removed!
Naivety and experience would clash with my next actions! You see, in my tumultuous enthusiasm and anticipation of DEMOLITION, it hadn't occurred to me that the actual physical dynamics of concrete may be a factor here. But at that point, there was only one thing going through my mind... HULK, SMASH!! A quick trip to our local hardware store and I return like a kid from a candy store that had just bought a sledgehammer... from a candy store...
Fortunately, there are no photos of my feeble attempts to reduce these seemingly fragile and dilapidated steps to rubble and it didn't take long for my construction experience to kick in and say, "quit screwin' around and get the real demolition toys out here!" This is also where I had come to my senses and realized that concrete takes about 30 years to fully cure and once cured, is about the next hardest thing to solid granite!
Alright, so now that I have returned from a second trip to the hardware store, this time armed with a large concrete breaker (of course this was the smarter way to go), it was time for a beer, I mean it was time to get the real demolition efforts under way! Upon commencement of the demolition, I was inundated with the feeling that I was being watched... As I turned to see who had taken an interest in my endeavor, I was surprised and delighted to see my daughter Meghan's face smiling in the window above the "destruction zone" so I asked her if she would like to take a crack at it. Thinking that she would not show the slightest interest other than sheer curiosity fulfilled from the window, she surprised me again by gladly and enthusiastically agreeing to the challenge! Of this I have photos and video! Great job Meghan! This would turn out to be one of Meghan's new favourite toys, (tools) followed closely by the hammer stapler!
What I thought would have only taken a couple of hours to demolish, turned out to be a weekend long ordeal but I was able to get this monstrosity torn down to manageable, bite-size pieces, (where they would sit in the driveway until such time when they could be removed, again, a story for another time!)
So that was actually the hard part, now on to the gravy! I already had a design in my head of how I was going to construct the new steps and landing and what the finished product might look. I had taken into account what was previously in place and how that system could be improved. The next few hours were relatively simple and effortless. A quick trip to the lumber store to pick up some goodies and this project is under way!
Well there it is, the new finished steps and landing!! Much easier and safer to ascend and descend and it's not hard to look at either!
Until next time, keep your monkey wrenched! ;)
Saturday, March 12, 2011
Tuesday, March 8, 2011
Your door, is ajar...
Well let's just keep this ball rolling shall we!
After last winter we had realized how cold some areas of our house could potentially get and I knew that we had to do something about it, more than just putting plastic over the windows, which of course seemed to be a yearly tradition, mainly to keep us and the kids from freezing but also to save on the energy bills!
So, just about 18 months ago, we made the decision to do something about it. There was a lot of hype about the eco-energy retrofit grant thinger that the government was offering back to homeowners that made the effort to improve the energy efficiency of their homes, thus reducing their carbon footprint, you know the story... or maybe not. So to take advantage of the situation and try to help save the world in the process, we had a company come in to inspect our home and report on our current energy loss and where it can be improved. Long story short, we had a few directions to go in!
Since the main entrance doors seemed to be a huge factor in our energy loss, we decided to start there! Actually, simply saying that we were loosing heat around the doors would be a huge understatement! As it turned out, the doors that I planned to removed had only a single pane of glass in them and any weather stripping that was once in place had been long gone! More than that though, our main entrance door was not a solid door as previously expected, but a hollow core door that had virtually no insulating capabilities other than slowing down the icy winds slightly, thus reducing the wind chill factor over the cats water dish a couple of notches!! "Well THERE'S your problem!"
The photo above shows the main entrance to the porch and the photo below it shows the back yard entrance to the porch. It may not be apparent in the photos, but there was a lot of room for improvement... especially around the jambs!
So, after choosing some new doors from our local hardware and lumber store, (and storing them for about 6-8 months, that's another story), it was finally time to have some fun! That means DEMOLITION and there is no better way to release some frustrations than to take them out on an inanimate object! lol! A sawzall and a couple of beers later and voila, we have a breezeway!
So the doors have been removed! Next step, throw in the new doors, right? WRONG!! Due to the fact that construction standards were at the pinnacle of minimalistic expectations way back when, a wee bit of structural work was required to, you know, hold up the walls and roof since I have now removed the structural supporting members... of course I am talking about the doors themselves!! Ah, the joy of renovating an old house!
Since removing the doors also included replacing the sill and threshold, it was time utilize some good ol' fashioned mill work and craftsmanship! Ah who am I trying to kid, I just wanted to play with my table saw!! ;)
I do have to give props to the building methods of years past though, especially when it comes to demolition, common nails make it easier to tear out old framing because they are smooth!!
Lets run through the checklist, shall we!? Old doors removed, check! New framing in walls, check! Openings prepared for new doors, check! Can't wait for my next pay, check! I guess it's time for the new doors! So by the magic of editing and for the simple fact of forgetting to take pictures during the actual install, here are the finished products!! (Well finished meaning the damn things are in and they close properly!)
Until next time, keep your hammer polished!
Sunday, March 6, 2011
New Fence!
Hello again!
Well here is a little story that should get this ball rolling again, for a while at least! This post is about a fence... a "fence post" if you will!! ;)
So as many of you would know, or maybe not, when we bought this house, there was an old fence in the back yard which was in a state of disrepair. The cedar posts were rotted through to the core, paint was peeling off, the rails and pickets were being held up by moss alone because the nails had long since rusted away!
As the story goes with this particular fence, our backyard neighbour, Dave, had constructed this fence some time ago to prevent both the riff and the raff that once resided here, from invading his territory. We had met this particular riffraff... this fence was a smart move on Dave's part!!
Well as it so happens, nature would eventually have it's way with this old fence and it would succumb to the elements, taking a new perpendicular position to that which it previously held. Interestingly though, it was almost as if this fence had know that it's purpose had been served and it could now lay down arms and rest knowing that it's duty was fulfilled... that or the thing just rotted and fell over!!
One day there was a knock at the door. It was the fence... actually, it was the fence's builder Dave and his son, coming the retrieve what was left of the fence and to offer up a suggestion. Originally, Dave and his son were planning to rebuild the fence during the summer of 2010, (ah summer...) and they wondered if I would be able to give them a hand to get a new fence put up before the fall. Naturally I agreed to help them since I had the necessary tools and the skills for the job. But as things turned out, for whatever reason, Dave and his son were unfortunately unable to follow through with their plans and we were left with a stack of fence boards sitting in our back yard.
Soon after our first beer we had a system worked out and the rest of the work was gravy! Fasten one side of the panel to the post which we had previously cemented into the ground, dig the next hole with the post hole auger, drop in a post, fasten it to the panel making sure that it's level and plumb, fill the hole with post concrete and move to the next section!! That's it! Were able to get 60 feet of 6' high pre-fab panel fence, including posts and concrete, installed in 2 hours and we could spend the rest of that beautiful summer day remembering how happy we were that it wasn't... winter!! So long everybody!
Start Time - 10:00 am
Beer Time - 10:03 am
Completion Time - 12:00 noon!
Thanks for reading! Please feel free to leave your comments! I'll be back soon with another edition to our addition! Cheers!
Well here is a little story that should get this ball rolling again, for a while at least! This post is about a fence... a "fence post" if you will!! ;)
So as many of you would know, or maybe not, when we bought this house, there was an old fence in the back yard which was in a state of disrepair. The cedar posts were rotted through to the core, paint was peeling off, the rails and pickets were being held up by moss alone because the nails had long since rusted away!
As the story goes with this particular fence, our backyard neighbour, Dave, had constructed this fence some time ago to prevent both the riff and the raff that once resided here, from invading his territory. We had met this particular riffraff... this fence was a smart move on Dave's part!!
Well as it so happens, nature would eventually have it's way with this old fence and it would succumb to the elements, taking a new perpendicular position to that which it previously held. Interestingly though, it was almost as if this fence had know that it's purpose had been served and it could now lay down arms and rest knowing that it's duty was fulfilled... that or the thing just rotted and fell over!!
One day there was a knock at the door. It was the fence... actually, it was the fence's builder Dave and his son, coming the retrieve what was left of the fence and to offer up a suggestion. Originally, Dave and his son were planning to rebuild the fence during the summer of 2010, (ah summer...) and they wondered if I would be able to give them a hand to get a new fence put up before the fall. Naturally I agreed to help them since I had the necessary tools and the skills for the job. But as things turned out, for whatever reason, Dave and his son were unfortunately unable to follow through with their plans and we were left with a stack of fence boards sitting in our back yard.
What now, you ask? Enter Mr. Gibson!
After accepting the request from Dave to build the fence in his place, I called upon my good friend and fellow carpenter Doug and my son Jamie to help me create this masterpiece! I use that term loosely at this point because neither one us had ever constructed a pre-fab panel fence before and we really had no idea what direction we were to go in! Well, besides right to left, but after a bit of head scratching and brainstorming, we had the first 2 panels in place!
Soon after our first beer we had a system worked out and the rest of the work was gravy! Fasten one side of the panel to the post which we had previously cemented into the ground, dig the next hole with the post hole auger, drop in a post, fasten it to the panel making sure that it's level and plumb, fill the hole with post concrete and move to the next section!! That's it! Were able to get 60 feet of 6' high pre-fab panel fence, including posts and concrete, installed in 2 hours and we could spend the rest of that beautiful summer day remembering how happy we were that it wasn't... winter!! So long everybody!
Start Time - 10:00 am
Beer Time - 10:03 am
Completion Time - 12:00 noon!
Thanks for reading! Please feel free to leave your comments! I'll be back soon with another edition to our addition! Cheers!
Saturday, March 5, 2011
Oh how the time flies!
Hello all!
We are sorry that we have neglected our blog and in turn kept all of you in the dark for so long!! It's amazing how fast time goes by when life takes precedence and the simple pleasures like keeping up relations fall by the wayside. We have been very busy with work and with our family's extracurricular activities, each of which warrants a blog of their own! So as a result, regular blog updates get fewer and farther between, which is obvious looking at the date of last post! ;) Luckily, the work on the house has progressed much farther than the work on the blog and we have many more stories of discovery, wonder, triumph and utter confusion to tell you about... just as soon as I can get my butt in gear!! It won't be long, I promise! Sounds kinda like a quote I heard from a joke someone told to someone else somewhere some time ago... "I have a great story to tell you about procrastination, but you'll have to wait for it!" Until then, take care! Corrie
Sunday, April 5, 2009
Heating Havoc!
Over the past few months, we have accumulated quite the collection of photos of what we have been doing at the house. Nearly 500 to be almost exact! So you can only imagine how difficult it is to choose the next subject to write about, simply because there are so many different direction that I can go in! But I think that I will return to the upper areas of the house for now because the rest of the house is filled with furniture that has no place to go!!
This story begins at the threshold of frustration and relief!! (Actually the old kitchenette and the bathroom, but you know what I mean!) By this point, we'd had a chance to give the house a good going over and we were starting to make decisions on what we were going to tackle in regards to renovations. . . We had talked about moving doors and walls to create better flow within the room, we discussed moving the bathroom to the center of the room and making a HUGE bathroom area, you know, a bathroom so big that if you fell down, you wouldn't hit your head on anything, as well as who was going to go in what room!
But with all of the suggestions that had come and gone, there were a couple of issues that kept surfacing. . . why was there no heat coming from the two heating ducts in the floor and what the hell was under that section of the floor in front of the bathroom? That question had peaked our curiosity a number of times but we had neither the time nor the means to investigate, until one day, curiosity got the better of me. . .
You may have noticed in one of the first photos that we had posted, (see "Working in the old kitchenette", the second photo), there is a section of floor that has been replaced with plywood. The plywood was really uneven and higher than the original floor. I thought to myself, "This just won't do!" And since I am never one to argue with myself, I ripped up the floor! Oh, what a treasure I found!!
My first reaction to this fantastic find. . . HA HA HA HA!!! I couldn't believe what I was looking at and I still don't believe that people consider this type of work acceptable! I don't just mean to a building inspector or contractor, I mean to themselves!!
Once again, it seems whoever worked on this house previously, didn't believe in letting anything go to waste and if that little piece of scrap wood fits in somewhere, that's where it was nailed!! There seems to be something hiding under there too. . . I'll get to that shortly. . .
Below, you will see a perfect example of what NOT to do with drywall compound!
Well, what do we have here?! It looks like. . . no. . . it couldn't be. . . IT IS!! That mess is supposed to be a heating duct! And don't tell me. . . yup, they used real duct tape for heating ducts!! WRONG!! Duct work is the only thing you can't use duct tape for!!
"Well there's your problem!" Red Green, eat your heart out!
This is a photo of the mess at it's absolute worst but there were still more surprises lurking beneath the surface! As I cleared away the overabundance of crap, I noticed that there was something missing, something rather important. . . can you say, STRUCTURE?! I have no explanation as to why they would cut a four foot section of floor joist completely out! But I guess they needed something to fill in the hole after??
So, with this ever growing list, I have figured that in a six foot square section, besides a carpenter I have had to become a structural engineer, a plumber/HVAC technician and an electrician! Let's see how I made out, shall we? Fast forward a couple of days. . . the mess is cleaned up, I have built a new, more efficient heating duct for the space that I had to work with, I have restructured the floor joists and installed a good insulation around the heating lines. Booyah!
We have since finished the floor in the bathroom, as seen in previous posts, and the old cabinets have been replaced with a full width structure that hides the plumbing and gaping holes in the floor which will be used as a shelf for books and plants, and cats. . . and an occasional Meghan! It will sit slightly lower than the back of the couch and I think, will add more character to the room!
Keep checking back, we will try to update the blog as soon as we can! Until next time, Cheers!!
Tuesday, March 24, 2009
Moving right along...
People ask me sometimes how things are going at the house, how we're making out. My automatic response to the question seems to be, "well, we are moving forward, slowly, but still forward!" We are finally in the finishing stages of the second floor areas! The bathroom is 95% completed. As of last night, the walls and floors in the hall and sitting room have been painted, the old kitchenette has been completely remove and all the drywall is finished and ready for paint in the 'blue' bedroom!
Occasionally, I look around the house and I try to visualize what the place looked like when we first stepped through the door. Thankfully, it's not as easy to remember all the gory details any more! I know that we still have quite a bit of work ahead of us and I wonder sometimes what we have accomplished and for a brief moment, a part of me thinks that we haven't made any headway. Then I go back to the photos which we had taken before we began any work and I realize that, yeah, we have come a long way in the past couple of months considering we are trying to do it on our busy schedules!! So, the photos below are a brief interlude to show what we had to deal with upon our initial inspection, minus the garbage and smell that we left for us by the previous tenants! Enjoy!
*Please note: Due to the graphic nature of the following images, we are not responsible for any visual and/or psychological damage incurred by the viewer. You the viewer reserve the right to laugh, vomit and /or shake your head in dismay at the following content.
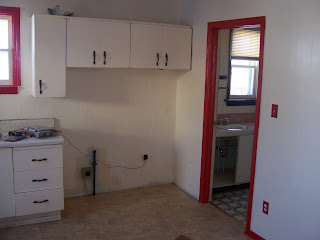
The above pictures show the left and right side of the main floor kitchen before we started. I just wish they had left the red knobs on the cabinets! They added a sort of, je ne sais quois!
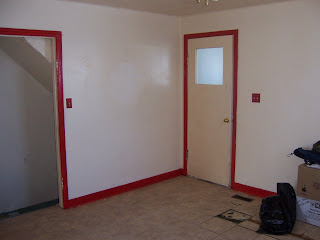
These pictures complete the 360 degree view of the kitchen area. Left, shows the entrance way to another bedroom, a closet, a closet the living room and the basement door. On the right, the basement door and the main entrance. Thankfully, all doors and baseboards were painted a nice glossy Tremclad Fire Engine Red, so that they can easily be located whilst navigating your way through billows of cigarette smoke, no less! Yeah, we got rid of the red. . .
Ah, it is to laugh, (or cry)!! This is a great example of what NOT to do!! If you can look past the flooring tiles lining the shelf, you will see a spider's web of wires twisted haphazardly amongst leaky pipes beneath the rotting kitchen sink! Yes, that's actually the drain from the dishwasher pointing away from the main sink drain! I'm not sure if the electrician tried to play plumber or vise versa, but whatever the case, it's WRONG!! My thoughts on this situation, and any situation that involves serious renovation, if you don't know what you are doing, STEP AWAY FROM THE TOOLS!!
We have completely removed all traces of what was 'the kitchen', (with exception to the trim around the windows, we installed clear plastic insullation imediately upon possession to save heat), and repaired what needed repairing or improving! We will post more pictures later of what we have accomplished! Actually, I could post them all now, but then there would be nothing to show later!! Hopefully you will be feeling better soon, after viewing these photos, and we hope to read your comments! Take care!
Saturday, March 21, 2009
The New Vanity
Well, with the priming and painting completed and the new flooring installed, it was time to tackle the new vanity! Anything would have been a definite improvement over the, uh... I'll just say installation, that had occupied the space before! (You can refer to the previous pictures of the old bathroom for reference if you wish but I think that if you had seen it once, you really wouldn't want to see it again!)
So, what were we to do with the space? This simple question had produced a mass of possibilities and even though we tried to keep things as simple as we could, it still brought up many questions! Should we go with a pedestal sink or cabinet? Regular bowl? Under-mount? How about a vessel style bowl? There was also, what colour and material should we have for the top? Never mind the plethora of faucet choices that were available to us! But with a bit of measuring and adopting the process of elimination, we were able to put together quite a sharp looking piece!
It was decided that we should just build the cabinet ourselves. If we made it to the maximum allowable size for the space available it would avoid any headaches in trying to locate a custom cabinet that probably wouldn't fit in the odd sized space anyway! My good buddy Moe Lapalme jumped right in on this one! He had consulted with Melinda and Meghan, measuring out and helping them decide what they want and need for the base cabinet. Once the final decisions had been made, Moe, using some nice plywood and his cabinetmaking expertise, created exactly what they needed for the space!
Once the base unit was touched up with wood filler, primed and painted, it was ready to be installed! Holes were cut in the floor of the cabinet to allow for the plumbing and the doors and handles were installed. Alright, almost half way there!! Melinda and I went out one day to look at what colour choices were available for laminate tops and we found three or four that would go nicely with the colours that were chosen for the bathroom as well as with the fixtures. We went with a copper coloured laminate which complemented the red in the flooring and grounded the yellow walls nicely. Meghan really wanted the blue glass vessel bowl from Home Depot, but we had to settle for a less expensive alternative, so we went with a white vessel bowl instead. It was about half the price but still a really good choice!
Okay, base was in, top was on, bowl was attached with silicone. . . what's next. . . oh, right! The plumbing!! I think that everyone should know a bit about plumbing so I wanted to get Meghan in on it, since this was for 'her' bathroom!
A bit of plumber's putty to create a seal around the drain and the bowl, then she attached the faucet lines to the water feed lines in the base cabinet. Once the water lines were hooked up, the real puzzle began! Trying to figure out how to get the water in the bowl to go down that stupid other pipe that didn't line up!!
Okay so maybe this part of the plumbing thing requires a bit more expertise, especially when the glue comes into play! Meghan suggested that maybe I should take it from here!
Alrighty then! The bowl is on, the faucet is attached, the water lines and drain are hooked up, I guess all there is to do now, is to try it to see if there are any leaks! Meghan was given the honour of 'tapping the keg'! Once it was decided that there were no leaks, we all took turns (because there wasn't a lot of room in there) checking it out and playing with the faucet!
Nice bathroom! Good job, everyone!
Subscribe to:
Posts (Atom)